How to Remove AI from Google Search Results
Google changed how search works. They added AI Overviews at the top of results. Some people like it. Many do...
Gadgets & Technologies Are Together
Learn how to edit videos in Premiere Pro color grading advanced with simple steps using Lumetri Color panel, adjustment layers, curves, and wheels for cinematic looks like teal shadows and orange skin tones perfect for Indian wedding films or YouTube reels.
Start by fixing white balance and exposure in Basic Correction, then shape tones with RGB curves for pro control on RAW footage, add masks for faces and skies, and boost speed with free plugins like Magic Bullet trial. Follow this full workflow scopes check, secondary qualifiers, vignette, grain to turn flat clips into Bollywood-style cinema ready for H264 export at 50mbps matching Rec709 for phones and web.
First, open your Premiere Pro project and import all clips. Make sure your footage is in good quality, like 4K from your Canon or Sony camera. Go to the Color workspace by clicking the color icon at the top right. This opens the Lumetri Color panel, which is your main tool for all grading work.
Create an Adjustment Layer from the Project panel. Right-click in the timeline, pick New Item and then Adjustment Layer. Drag this layer above all your clips. Why do this? It lets you apply color changes to many clips at once without touching each file. Indian editors love this because wedding shoots have hundreds of clips from multiple cameras.
Next, match your sequence settings to the footage. Go to Sequence and select Sequence Settings. Set frame rate to 25fps or 50fps, common for Indian videos. This keeps colors smooth during grading. Reset Lumetri by clicking the reset button in each section. Now you are ready to fix exposure and white balance before creative work.
Read More: How to Set Up A/B Testing Tools Free for Your Website or App
Before advanced grading, make colors correct. Nobody watches videos with wrong skin tones or dark shadows. In Lumetri Color, start with the Basic Correction section.
Drag the White Balance eyedropper to a neutral gray area in your clip, like a white shirt. This fixes color casts from indoor LED lights, common in Mumbai studios. Adjust Temperature slider left for cooler blue tones or right for warm orange, like sunset shots in Rajasthan. Tint fixes green or magenta shifts from cheap ring lights.
Now Exposure. If your video is too dark, pull Exposure up by 0.5 to 1.0. Pull down if over bright. Contrast adds punch, set to 1.10 to 1.20. Highlights pull back bright sky areas, say -20 to -50. Shadows lift dark faces, +30 to +50. Whites and Blacks crush or lift extremes for clean looks.
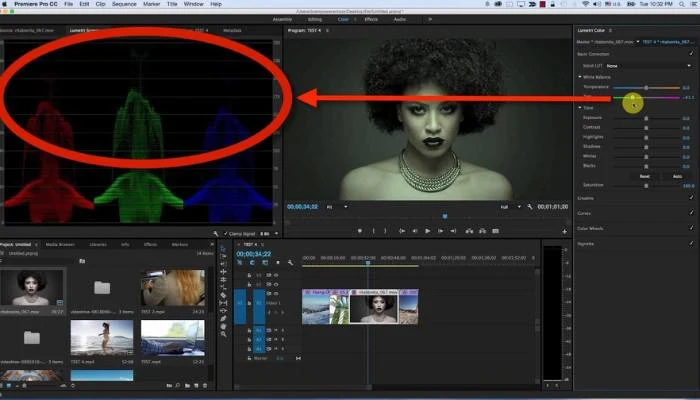
Check with scopes below the panel. Waveform should sit between 0 and 100 IRE. Vectorscope shows skin tones near the skin line, I for Indian medium tones. Histogram needs no clipping on left or right. Do this for every clip. Indian wedding editors spend 30 minutes here because faces must look natural under mixed lights.
Curves give power over light and color in ways sliders can't. Click Curves in Lumetri. The line starts flat. Pull the bottom left up for deep shadows lift, good for low light Diwali clips. Curve middle S shape adds contrast, like Hollywood films.
RGB curves control all colors together. Red curve boosts reds for vibrant Holi powders. Pull low end down for deeper skin warmth. Green for grass fields in Punjab shoots. Blue for ocean or night skies.
Individual color curves shine here. In shadows of Blue curve, pull down for teal look in action scenes. Midtones Red up for golden hour portraits. Highlights Green down to tame yellow skies. Indian creators use this for Bollywood style, where heroes have warm glow and backgrounds cool.
Add points on curve for control. Click to add point, drag to shape. Smooth with mouse for natural falloff. Compare before after with the small preview toggle. Practice on 10 clips daily to get fast.
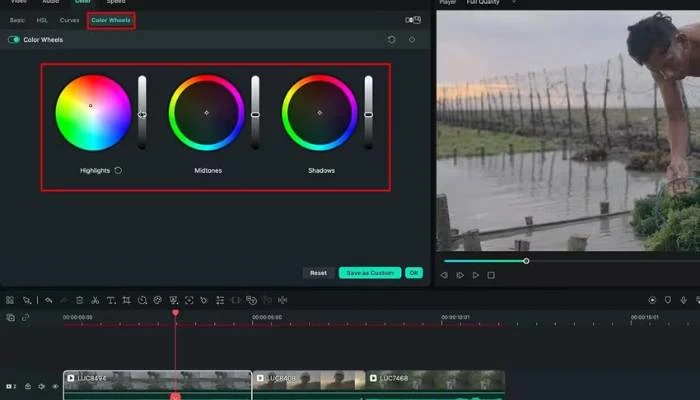
Wheels sit next to curves. They control shadows, midtones, highlights separate. Gain knob changes saturation with lift or gamma.
For cinematic color grading Premiere Pro style, shadows go teal. Pick Shadows wheel, drag direction to cyan-blue, saturation 20-30. This makes dark areas rich, not black mud. Midtones orange for skin pop, direction towards yellow-orange, sat 15. Highlights to cool cyan, sat 10. Desaturate blacks slightly for film look.
Indian short film makers add split toning here. Warm shadows, cool highlights mimic Fuji film stocks. Adjust balance slider 50-50. Gamma sets midtone strength. Use Alt drag to reset any wheel.
Preview on broadcast monitor if you have one. Scope check: RGB parade balanced, no one channel spikes.
Premiere Pro color grading plugin saves time for advanced work. Free ones work great for Indian freelancers.
Magic Bullet Looks by Red Giant tops list. Install from Boris FX site, free trial. Drag effect to adjustment layer. Film presets like Kodak 2383 give instant cinema. Tweak Beautify for skin smooth, common for wedding faces.
Free option: Color Finale 2 Lite. Download from site. Wheels more powerful than stock. Layer based, stack grades. Good for before after stacks. Lumafusion plugins if mobile first. But stick Premiere for desktop power.
Indian YouTubers use Dehancer for film grain. Adds real 35mm texture to digital. Set grain 0.3, softness 50. Matches ARRI Alexa looks on budget cameras.
Install plugins from Effects panel search. Apply to adjustment layer. Render preview for smooth playback. Cost under 5000 Rs yearly, worth for pro work.
Practice on free Pexels clips daily.
You May Read Also: How to Increase Website Conversion Rate: 10 Proven Tips
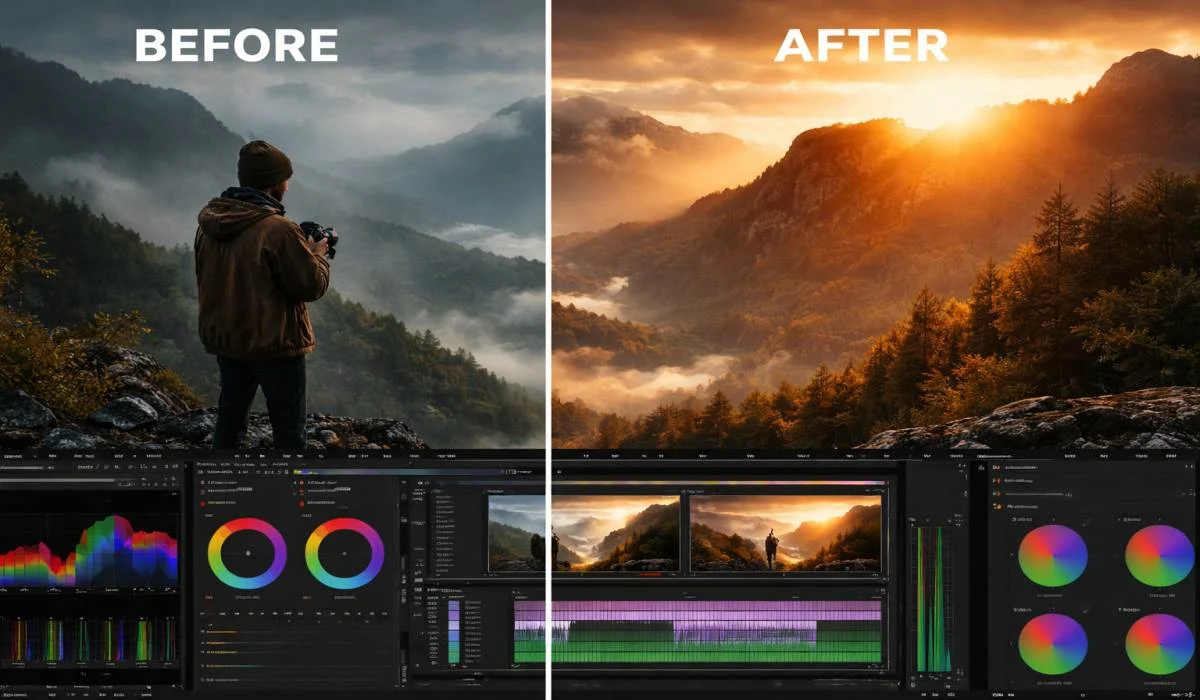
Now you have the full steps to edit videos in Premiere Pro color grading advanced. Your clips go from flat and boring to sharp cinema style that pulls viewers in right away.
I remember working on a friend's Delhi wedding video last month after fixing shadows teal and skin warm orange, the hall shots looked just like movie scenes.
Test these on your next Reels or YouTube upload, check colors on your phone first, and adjust for our bright sunlight or dim indoor lights. Bit by bit, you build skills that get more likes and shares.
Pull up Lumetri Color, pick eyedropper for white balance on a gray shirt, slide exposure till faces brighten without washout, add contrast punch do one clip first to feel it.
Teal shadows with wheel drag, orange lift on faces via midtones, soft vignette around edges—works magic on mixed LED and tungsten lights from multi-camera setups.
Grab Magic Bullet trial or Color Finale free version, drop on adjustment layer for quick film looks—saves time grading long event footages shot on budget DSLRs.
Switch to camera log profile on import, slap on Rec709 LUT, then curve shadows up and highlights down hard—RAW gives room to fix overexposed Rajasthan skies easy.
One layer grades 50 clips together, no messing original files key for Mumbai shoots with hours of dance and ceremony from two cameras running non-stop.